Niezbędne słownictwo i pojęcia dla maszyn do grawerowania laserowego (Przewodnik dla początkujących)
Grawerowanie laserowe umożliwia tworzenie szczegółowych obrazów, precyzyjnych cięć i szybką personalizację — ale słownictwo może być przytłaczające. Ten przewodnik wyjaśnia kluczowe terminy i pojęcia, abyś mógł ustawić parametry, unikać błędów i tworzyć z pewnością siebie.
W tym przewodniku
- Dlaczego słownictwo ma znaczenie
- Podstawowe terminy laserowe
- Moc i prędkość
- Rozdzielczość grawerowania
- Ostrość i pozycjonowanie
- Warunki materiału
- Koncepcje oprogramowania
- Pułapki dla początkujących
- Szybki słownik
- Podsumowanie i kolejne kroki
Dlaczego warto znać słownictwo grawerowania laserowego
Laser to nie drukarka typu plug-and-play. Wyniki zależą od równowagi mocy, prędkości, ogniskowania i rozdzielczości. Poznaj te terminy, a zrozumiesz tutoriale, poprawnie ustawisz materiały i unikniesz niepotrzebnych strat.
- Korzystaj z przewodników bez zamieszania.
- Pewnie wybieraj ustawienia dla różnych materiałów.
- Pracuj bezpiecznie i chroń optykę oraz mechanikę.
Podstawowe terminy grawerowania laserowego
- Moduł / tuba laserowa: Źródło wiązki. Lasery diodowe (5–20W) są powszechne na biurkach; tuby CO₂ (40W+) zwiększają moc cięcia. Moc wpływa głównie na grubość cięcia, a nie na ostrość grawerowania.
- Optyka (soczewki i lustra): Soczewki skupiają wiązkę; maszyny CO₂ używają luster do jej kierowania. Czysta optyka jest niezbędna dla stałej mocy wyjściowej.
- Rozmiar plamki wiązki: Średnica skupionej wiązki. Mniejsze plamki = drobniejsze detale, ale zwykle płytsze cięcie.
- Szerokość cięcia (Kerf): Szerokość materiału usuwanego podczas cięcia. Uwzględnij kerf przy projektach z dopasowaniem na wcisk lub łączeniach.
- Wspomaganie powietrzem: Kierowany przepływ powietrza, który usuwa dym i zanieczyszczenia, poprawiając jakość krawędzi i zmniejszając przypalenia.

Źródło zdjęcia: Omtech
Pojęcia dotyczące mocy i prędkości
Grawerowanie i cięcie polegają na zastosowaniu odpowiedniej energii do materiału.
- Moc (Wat): Nominalna moc wyjściowa modułu/tuby. Wyższa moc ułatwia cięcie grubszego materiału.
- Procent mocy: Ustawienie oprogramowania, które skaluje moc wyjściową. Wielu użytkowników ustawia 60–80%, aby zrównoważyć wydajność i żywotność tuby/modułu.
- Prędkość: Prędkość ruchu głowicy laserowej. Przy cięciu wolniejsze prędkości i większa moc dają głębsze cięcie; przy grawerowaniu szybsze prędkości i mniejsza moc zapobiegają przypaleniu.
- Przejścia: Powtarzanie tej samej ścieżki. Kilka umiarkowanych przejść często daje czystsze krawędzie niż jedno przypalone przejście o dużej mocy.
Warunki rozdzielczości grawerowania
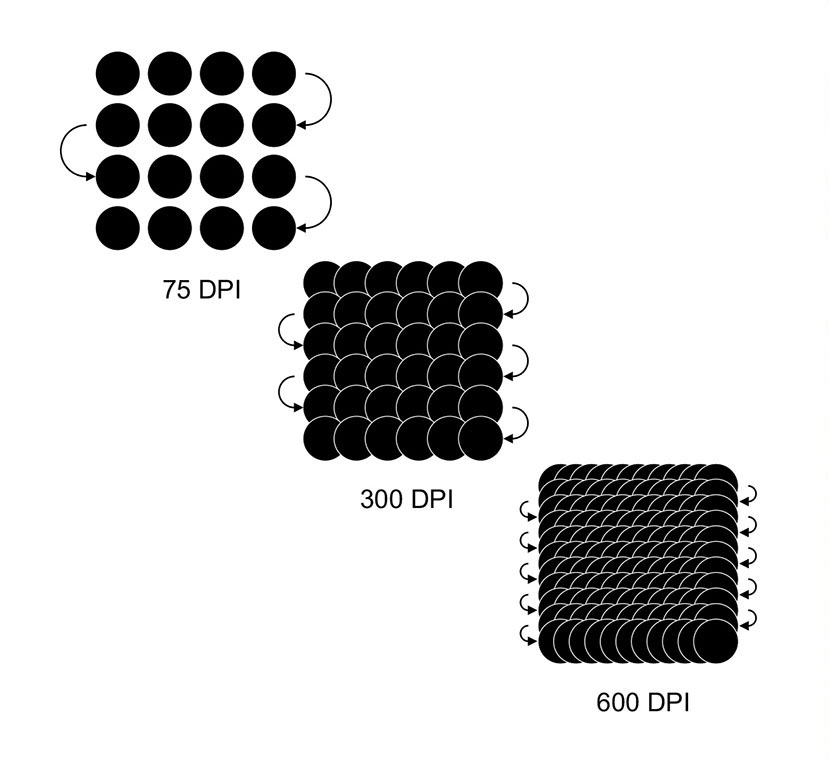
Źródło zdjęcia: Epilog Laser
- DPI (punkty na cal): Rozdzielczość grawerowania. Wyższe nie zawsze lepsze — na drewnie 300–400 DPI często wygląda czyściej niż bardzo wysokie DPI, które przypala.
- Interwał linii / odstęp skanowania: Odległość między liniami skanowania rastrowego. Mniejsze odstępy = gładsze przejścia, ale dłuższy czas pracy.
- Grawerowanie rastrowe: Skanowanie tam i z powrotem jak drukowanie; najlepsze do zdjęć i cieniowania.
- Grawerowanie wektorowe: Podąża za ścieżkami (liniami/krzywymi); najlepsze do logo, konturów tekstu i precyzyjnego znakowania.
Wskazówka: Wybierz DPI w zależności od materiału i stylu grafiki. Zdjęcia mogą wymagać wyższego DPI; wyraźne oznakowania na drewnie zwykle nie.
Ostrość i pozycjonowanie
- Ostrość: Reguluj odległość soczewki od materiału dla najmniejszej plamki. Zła ostrość poszerza szczelinę, osłabia cięcia i rozmywa detale.
- Oś Z / wysokość stołu: Podnoś/opuszczaj głowicę lub stół, aby ustawić ostrość przy zmianie grubości materiału.
- Pochodzenie / punkt startowy: Punkt startowy pracy. Ustaw go konsekwentnie (zwykle przód-lewy/góra), aby wyrównać grafikę z materiałem.
Warunki materiału
- Do grawerowania: Drewno (lite, sklejka, MDF), akryl, skóra, papier, tektura, tkanina, łupek, szkło, metale anodowane/malowane.
- Nie grawerować: PVC/winyl i niektóre tworzywa sztuczne wydzielają toksyczny chlor; niektóre poliwęglany mogą produkować szkodliwe opary. Zawsze sprawdzaj bezpieczeństwo materiału.
- Maskowanie / warstwa ochronna: Taśma/folia nakładana, aby zmniejszyć plamy dymu—szczególnie przydatne do drewna i akrylu.
Koncepcje oprogramowania
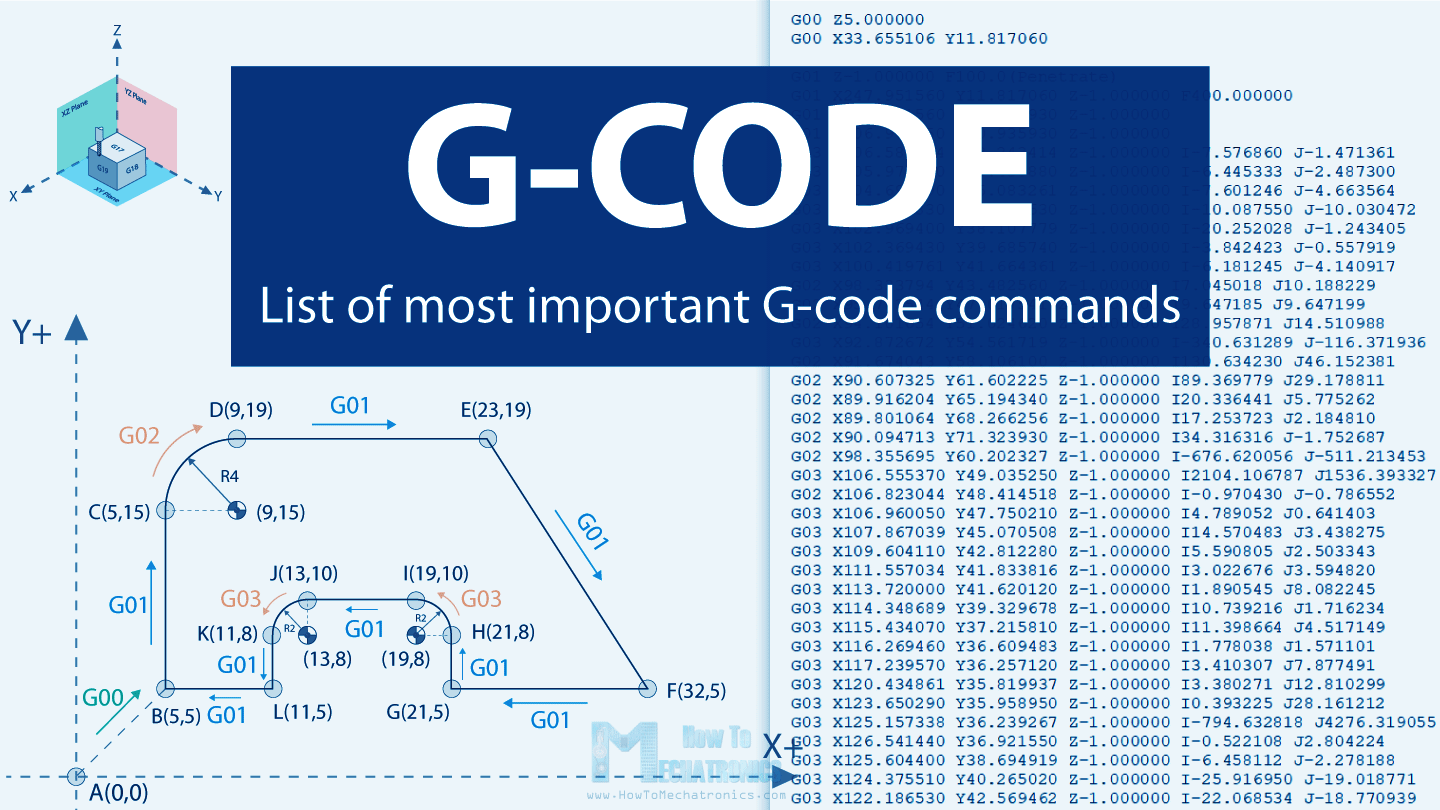
Źródło zdjęcia: Endurance Lasers
- G-code: Instrukcje maszyny określające ruch, moc i czas.
- Oprogramowanie sterujące: Wysyła zadania i kontroluje maszynę (np. LightBurn—płatne, bogate w funkcje; LaserGRBL—darmowe, przyjazne GRBL).
- Pliki wektorowe (SVG, DXF): Ścieżki odpowiednie do cięcia i grawerowania obrysów.
- Pliki rastrowe (PNG, JPG): Obrazy pikselowe odpowiednie do grawerowania zdjęć i cieniowania.
Typowy przepływ pracy: Projekt → Ścieżka narzędzia/G-code → Wysyłka do maszyny.
Typowe pułapki dla początkujących (słownictwo w praktyce)
- Przesadne mocowanie cienkich materiałów: Używaj wyższej prędkości/niższej mocy, aby uniknąć przypaleń i topnienia.
- Zła wysokość ogniskowania: Ponownie ustaw ogniskowanie po każdej zmianie grubości materiału.
- Brak pomocy powietrznej: Spodziewaj się brudnych krawędzi i śladów dymu bez niej.
- Nieporozumienia dotyczące DPI: DPI wpływa na detal, nie na głębokość cięcia.
- Ignorowanie kerfu: Uwzględnij szerokość wiązki w połączeniach na wcisk i elementach puzzli.
Szybki słownik odniesienia
| Termin | Definicja |
|---|---|
| Kerf | Szerokość materiału usuwanego przez wiązkę lasera; kluczowa dla dopasowania. |
| DPI | Punkty na cal; kontroluje rozdzielczość i czas grawerowania. |
| Raster | Skanowanie tam i z powrotem dla obrazów i cieniowania. |
| Wektor | Ruch podążający za ścieżką do obrysów i cięcia. |
| Pomoc powietrzna | Przepływ powietrza przy cięciu, który usuwa dym i zmniejsza przypalenia. |
| Ogniskowanie | Odległość soczewki od materiału dostosowana dla najostrzejszego punktu wiązki. |
| Przejścia | Ile razy laser powtarza tę samą ścieżkę narzędzia. |
| Maskowanie | Taśma/folia chroniąca powierzchnie przed plamami dymu. |
Podsumowanie i kolejne kroki
Opanowanie terminów takich jak kerf, DPI, raster kontra wektor, pomoc powietrzna i ogniskowanie zmienia metodę prób i błędów w powtarzalne rezultaty. Używaj tego słownika jako odniesienia podczas dostosowywania materiałów i projektów.